Features · the pipeline in detail
Six stages, each with a job of its own.
This page is about what happens inside each single stage: which artefacts go in, which come out, where you decide, and what ends up in the course package.
The order is a commitment, not a suggestion. Every stage works on what its predecessors produced. Open a stage whose predecessors are still incomplete and you are sent back to the first incomplete one – and anything that cannot be established as complete counts as incomplete. Every stage is checkpointed, so an interrupted run can be resumed.
Before stage 01
Your brief comes first
- In
- Your intent
- Out
- Instruction, context, personas
The pipeline does not generate into the void. Before the first file is processed you say in your own words what should come out of it: an instruction, the subject-matter context, and the people the course is meant for.
This guidance is free text, and it is never overwritten: each version is appended, with the full history kept. Individual source files can carry guidance of their own as well.
- Instruction – what kind of course to build, in which language and with which emphasis.
- Context – the setting the course will be used in.
- Personas – the learners the course has to reach.
- Versioned – guidance is appended, not replaced; the history stays readable.

Stage 01 · Parsing
Documents become readable text
- In
- Your source documents
- Out
- Text per file
You upload your source material – PDF documents today. Files go straight into object storage over pre-signed links, and are only activated for the run once they have durably arrived there.
After that every file is converted from document to markdown as its own background job. The extracted text stays visible in the application – you can read what the next stage will be working from.
- One status per file – each file shows for itself whether it is ready and whether its text has been extracted.
- One job per file – conversion runs in the background, and files do not block one another.
- Text you can read – the result is not an opaque intermediate state but visible text.


Stage 02 · Knowledge
Many sources, one knowledge base
- In
- Text per file
- Out
- A summary per file & one knowledge base
This stage runs in two passes. First, knowledge is extracted from each file on its own – you get a summary per source that you can actually read. Then those individual results are aggregated into a single, course-scoped knowledge base.
The difference matters: ten documents do not turn into ten parallel truths but into one shared foundation for the design stage to work on.
- Per file – its own summary, opened on its own and repeatable on its own.
- Across all sources – one aggregated knowledge base that belongs to this course.
- Readable before it moves on – both results are there in plain text in the application.

Stage 03 · Design
You state the intent, eCourse builds the structure
- In
- Knowledge base & your design instruction
- Out
- Course design: modules, lessons, objectives
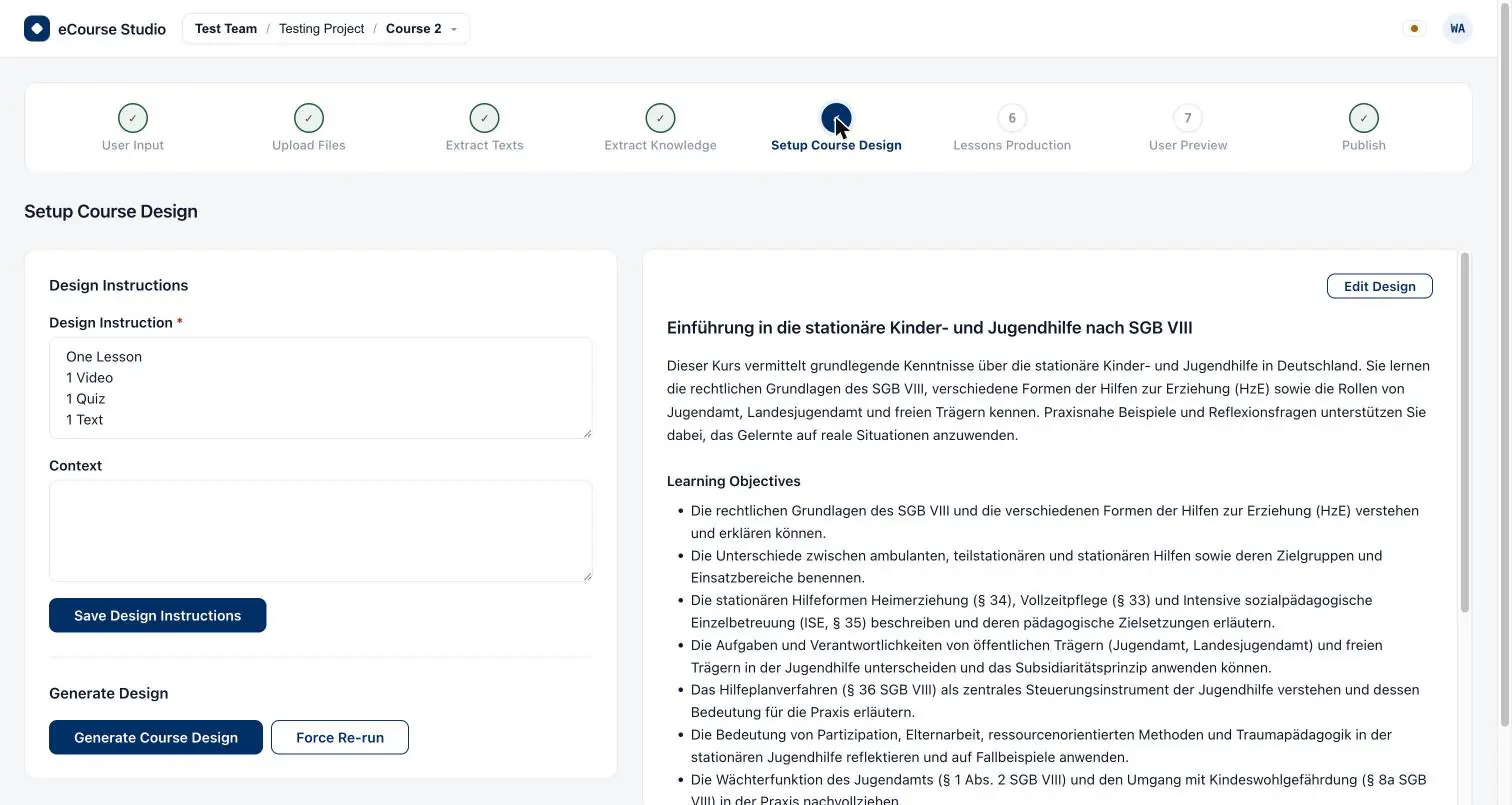
The design instruction is short and concrete: one lesson of each kind, one video, one quiz, one text – or whatever shape your course needs. A language model turns that into a complete course design: title, description, learning objectives, and modules holding the individual lessons with their types.
Then it is your turn. The design can be read, edited by hand or regenerated before anything is produced. Edits overwrite nothing: each one is stored as a new version.
- Title and description – what the course stands for, in your language.
- Learning objectives – written out, as a list, open to editing.
- Modules and lessons – the shape of the course, every lesson with its type.
- Versioned, not overwritten – every edit becomes a new revision.
Stage 04 · Production
One job per lesson, four steps per course
- In
- The approved course design
- Out
- Text, transcript, video and quiz per lesson
The course design turns into a production that fans out: every lesson starts a job of its own, and production itself splits into four steps that run independently.
Each of those four steps can be bound to a different AI provider account – no single model has to be equally good at prose, video and questions. And every lesson carries its own status: whatever goes wrong is repeated on its own, not as a whole course.
- A status per lesson – you can see which lesson is finished and which is not.
- Repeatable one at a time – every lesson has its own regenerate button.
- Or all together – a run across every lesson stays available.
1 · Text script
The written-out lesson text that learners will read.
2 · Video transcript
Scene by scene: narration and visual cue – the state you approve.
3 · Video generation
Only after approval: the transcript becomes the finished video file.
4 · Quiz
Questions with the correct answer marked and an explanation alongside.
Video is deliberately two-phase, with a human in the middle. The transcript comes first. You approve or rewrite it – and only then is the render job enqueued. That is exactly why a video lesson sometimes sits still in the overview: it is waiting on your decision, not on compute.

Stage 05 · Validation
The whole course, before it leaves the building
- In
- The produced lessons
- Out
- The reviewed course
Up to here you have been looking at individual lessons. Validation turns the perspective around: the course is there as a whole – learning objectives, modules, and beneath them every lesson, expandable.
Not as a list of statuses but as content: the text of a text lesson, the scenes of a video lesson with narration and visual cue, the questions of a quiz with the answer marked and explained. What you read here is what goes into the package.
- Course level – objectives and modules in context, not as loose parts.
- Lesson level – every lesson expandable, with the content it actually holds.
- All three types – text, video scenes and quiz all read the same way here.


Stage 06 · Publishing
A package your LMS understands
- In
- The reviewed course
- Out
- LMS-ready ZIP package & download link
The last stage renders, assembles and uploads. What comes out is a distributable course package: one folder per module, and inside it one file per lesson – HTML for text, quiz and transcript, MP4 for video.
The download runs over a link that is deliberately short-lived and states its own expiry. After that your learning platform takes over: eCourse authors courses, the LMS delivers them – for example ELP, the platform from the same house.
- One folder per module – the shape of the course design stays visible inside the package.
- One file per lesson – HTML for text, quiz and transcript, MP4 for video.
- Short-lived download link – with a visible expiry instead of a permanent share.

Across every stage
Your own key – and a different one per stage
Team settings are where you register your own provider credentials. First as defaults: one provider for text, one for video. Below them, under “Stage Overrides”, it gets stage-specific – parsing, knowledge, design, production, validation and publishing each take credentials of their own.
Production is the one stage that carries two bindings: a text provider and a video provider. That is also the stage where the work fans out into four steps.
- Checked on registration – credentials are validated against the provider and can be rotated later.
- Provider catalogue – providers, capabilities and models sit in a matrix that decides what may be bound where.
- Default plus override – without a stage-specific entry the team default applies.
- No single-model lock-in – no one model has to be equally good at all six stages.


Across every stage
Teams, projects, courses
eCourse is multi-tenant, and the ordering is plain: a team holds projects, a project holds courses. Producing for several clients, you separate them by project; working by department, the same.
Members join by invitation and hold a role: owner, co-owner, admin or member. Permissions are not a matter of individual screens – every action goes through the same check, wherever in the pipeline it is triggered.
- Team → project → course – a hierarchy that keeps clients and departments cleanly apart.
- Four roles – owner, co-owner, admin and member, granted through invitations.
- One authorization check – no action gets past it.
- Usage per team – metered, and capped with budgets.
What is metered
Usage is recorded across eight dimensions. Budgets are set on top of them – a team or a project can be held tighter than the plan allows, never wider.
- AI calls
- Storage
- Projects
- Courses per project
- Pages per file
- Job runs
- Video minutes
- OCR pages
How much your plan includes, and where your own keys take over, is on the pricing page.
Common questions
On the stages, one by one
- Which files can I upload?
- PDF documents today. Every file is uploaded on its own, converted to text on its own and carries its own status – so you can see per file how far the parsing stage has got.
- Can I regenerate a single lesson?
- Yes. In the production stage every lesson gets its own job and its own regenerate button. You can repeat one lesson without producing the whole course again – or restart all lessons together.
- Can I bind a different AI provider to each stage?
- Yes. Team settings hold a default provider for text and one for video, and below them an override per stage. The production stage takes both a text and a video provider.
- Which roles exist in a team?
- Owner, co-owner, admin and member. Members join by invitation. Every action goes through the same authorization check – nothing gets past it.
- What is metered per team?
- Usage is recorded across eight dimensions: AI calls, storage, projects, courses per project, pages per file, job runs, video minutes and OCR pages. Budgets can be set on top of them.
- Why can't I skip a stage?
- Because every stage works on the artefacts its predecessors produced. Open a stage whose predecessors are not complete and eCourse sends you back to the first incomplete one. If the state of a preceding stage cannot be determined, it counts as incomplete.
Start with your own material.
Create an account, pick a plan, upload your first source documents — the LMS-ready ZIP package comes out of exactly the pipeline you have just read about.